For my BA5 interactive game project I will be creating a small section of the Japanese house in which mine and Sophie's game reinvention from the last project is set in. The aim behind this project is to create some form of interactive assets that are well modelled, textured and lit.
In response to this I am working building my 3D house in the form of a grey box, in which the structure functions to a high potential and runs in either UDK or the CryEngine. To support the grey box model I am going to include a small number of modelled and textured assets, which when in game the player is able to look at and maybe interact with in extreme detail.
I have looked at a number of Japanese house designs to get an idea of their layouts and interior design.


From what I have found, a lot of modern Japanese houses have very low standing furniture, like their tables and sofas, as they kneel or sit on the floor at the table to eat. With this in mind I have started building a small 3D model consisting of three rooms, with only one which is going to house all my assets to set the focus point for my model. The idea of the other two rooms is when in game the player is able to get a feel for movement and build up their wonder through the empty rooms to the last one full of detail.
Model Reference Images


In the room with the assets I am going to include a table, shelves and a sofa.
Here are some images of the early stages of the grey box house and its assets
 |
| The three room grey box |
 |
| Shelves |
 |
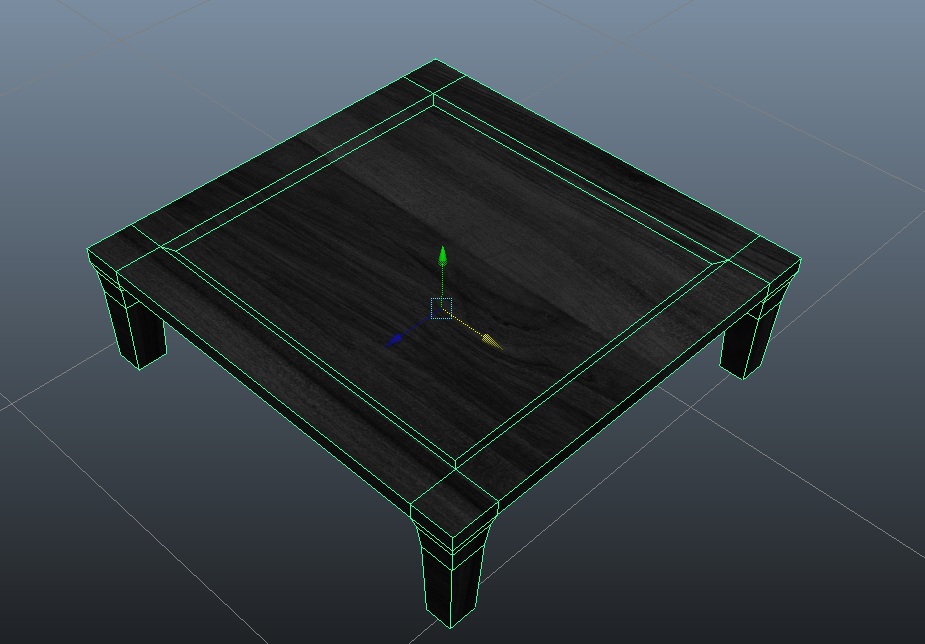
| The table |
 |
| Sofa |
I showed my assets to my lecturer. He was happy with them. I then went on to UV mapping my assets. Completely forgot how hard I found mapping before when doing the door project last year. To get to grips with the UV system again I started on something simple like a pillow, assigned a checker box texture to it to get the UV's aligned correctly and then applied the sofa fabric texture.
I encountered a number of problems when trying to map the sofa. There were hidden faces and edges going off in odd directions everywhere so I deleted a selection of faces, and made a simpler version. I a, very happy with the final result. I also included some screen shots of the UV's for the sofa.
 |
| The Sofa (all UV's linked) |
 |
| The small cushions (all UV's linked) |
 |
| The large cushions (all UV's linked) |

I also mapped and textured the floor with a floorboard texture. To map just the floor,
I selected its faces and assigned it as a material.

My overall knowledge of Maya does lack in a lot of areas, but the struggle is part of learning. I have been refreshing my skills by conducting activities like UV mapping, adjusting UV's, adding textures to objects and re gaining an understanding of assets that are game ready and assets that aren't. The key aspect about Maya that I have re learnt is remain vigilant of everything you have made and take your time with everything you do. If something is rushed and not properly it will most likely contain hidden faces, stray vertices and not function properly as a game ready asset.
When I was constructing the room segments I started by making a cube and extruding top and bottom edges, merging the vertices at all the joining corners.
 |
| Overall layout of one of my designs, influenced from a floor plan of a Japanese house. Stopped this design after encountering a number of problems |
 |
| Extruding edges out to create the solid walls |
 |
| Merging the vertices of each side to fill the gaps. (Could have used append polygon tool) |
I encountered some serious problems with areas being insufficient with hidden faces and areas not properly combined, and mis aligned edges all over the model. I found this method very time consuming too. One of my peers suggested something even simpler than extruding edges from one shape to make multiple rooms. She said make a cube, extrude it inwards to make a wall and then extrude it down to create a hollow cube with a sold wall surrounding it. I then duplicated the shape into three, deleted the outside faces of where I would combine them to avoid overlapping faces and doing the same vertices merging method as last time, sewing them all together.
I have put together a small step by step on how I made a simple game ready room from a cube:
Creating a simple room structure from a cube
 |
| 1. Make a cube |
 |
| 2. Select top face |
 |
| 3. Select Extrude |
 |
| 4. Press E and scale the face in |
 |
| 5. Select Extrude again and press W and move the face down |
 |
| 6. Ensure the face is literally overlapping the bottom one, so when you delete it the inside and outside edges will be level |
 |
| 7. Delete the face and you will be left with a hollow under belly of the shape |
 |
| 8. Select an edge and extrude it using the Extrude>W>Move system from step 5 |
 |
| 9. Ensure the edge has been extruded close to the other side. Select Vertex option and select the Merge Vertices tool>drag the extruded edge vertices over the ones on the inside corners of the faceless cube. |
 |
| 10. Viola!
Once I had constructed one shape it was just a matter of scaling it to a realistic size and duplicating it.
Merging shapes to create the rooms
|
 |
| 1. Duplicate the rescaled object created in the previous mini walkthrough |
 |
| 2. Delete the faces where the shapes are going to merged so none of them are overlapping |
 |
| 3. Move the objects within a reasonable, aligned proximity of each other. I found that I couldn't simply merge the vertices to separate objects, so I had to combine them. |
 |
| 4. To combine the objects, hold down and drag over them or shift and click over each one>Mesh>Combine. this will make all three objects one object. This means that when you select any of the three objects they will all be scaled, move or rotated as a whole. |
 |
| 5. Use the merge vertices tool again and merge all the vertices together from corner to corner |
 |
| 6. It will create a perfectly formed corner with all three objects merged |
 |
| 7. Ensure you have merged all the vertices below as well ! |
 |
| 8. The finished result should leave you with all three objects combined
Mistakes and Resolutions
I had a feed back session with my lecturers today. I showed them my progress on the 3D mini segment of mine and Sophie's flat from the previous project. Overall so far so good. A number of vital points were brought up. First was have all three rooms as 3 separate objects, with small corridors attached to enable some form of content loading sequence when exported into UDK.
One of my peers helped me out with my model and UV's to ensure I was on the right track. He mentioned that the door frames were the wrong size. I scaled them around the model i imported from Mudbox, but it was still a little off scale. When I started removing the door frames I encountered a number of issues with hidden faces and vertices. It was a mess, so I started again.
He had a look at my sofa model I made. I used way too many subdivisions and quickly walked me through a faster and more efficient way to model a new sofa. Firstly, a number of my faces on the main framing of the sofa wasn't split well enough for UV's so we added more edges to split the faces into better shapes. For the pillows we made a simple rectangle and beveled the edges instead of adjusting vertices bit by bit to add curves. The same was done with the smaller pillows, and then cut the corners off to add the softer edges. To get a smooth look to the furniture all adjustments were made using soften edge and soft select switched on.
Above are all my assets with the UV's. Not all are textured just yet. The UV's for the table and shelves are still a work in progress because they aren't all merged yet.
As you can see all my textures are in black and white. This will apply to everything in the model. As mine and Sophie's game idea is set in black and white, I stuck to that visual concept to maintain consistency. It also creates a very authentic, dingy mood. Yellow is the symbolic colour of our game, so I am going to use yellows from both natural and man made light to create an ambient atmosphere in the rooms.
The last couple of days have been fun. A lot of time well spent in the studio working on my 3D assets. Today was focused around exporting objects into UDK. Luckily it all worked out okay. The only trouble was none of my assigned textures would work, so there fore I am having to take a whole new lesson on assigning textures by using Photoshop. Putting that aside I had to re do all my UV maps for assets as they were mapped using Automatic Mapping, which is a no no, unless entirely necessary. Instead I mapped my shelf, table and the walls surrounding the room by Planar Mapping areas of the object side by side. This gave me a mass of UV's all from different angles of the shape which I then had to adjust.
Here are my new UV's for my table (top image) and my book shelf (bottom image). Each one was mapped by following these steps:   Step 1: Select the faces to Planar Map. With Planar Mapping ensure its only a FLAT selection of faces, so no corner pieces, only what you would see from a birds eye or straight viewpoint!  Step 2: With all faces selected on the TOP faces only    Step 5: Select the UV Texture Editor option in the top right corner of the screen on the third interface row  Step 6: It will bring up a separate table displaying your UV of the table surface (left of the grid) from here you can adjust the size of your UV's in order to fit textures and then scale the UV's to fit in the top right corner grid square. The much smaller shapes in the UV table are the table legs and the sides, which I mapped side by side, to get every little detail in ready for texturing. This was done by Planar Mapping too  To UV map the shelf I followed the same method, by mapping the shape one side at time from side to side and bottom to top. My course mate Jess Smith had created a set of notes on exporting objects from Maya in UDK (Unreal Development Kit). Supporting these notes will be my attempt at exporting my own assets into the game engine. Enjoy!
Importing
and Exporting to UDK/Boss Notes
<!--[if !supportLists]-->·
<!--[endif]-->UDK sometimes needs to have your
model/assets combined before you export to the engine. In our case, we must
combine our objects and save as a separate FBX file to ensure it works in UDK.
<!--[if !supportLists]-->·
<!--[endif]-->You can’t use the Maya 2D textures in
UDK.
<!--[if !supportLists]-->·
<!--[endif]-->For your textures ensure you keep a
PSD of the layers for the diffuse, specular and normal maps and you can use TGA
files for each of the maps separately so they can be placed onto your model and
loaded through Maya.
<!--[if !supportLists]-->·
<!--[endif]-->File > export selection > in the
directory go to the right and select “smoothing group” > under file name
drop down select FBX (if you don’t have FBX option/smoothing group go to window
> settings preferences > plugin manager > tick 2 boxes to allow FBX
& smoothing group) > name your file > click export selection.
<!--[if !supportLists]-->·
<!--[endif]-->Open UDK > all programmes > game
engines > unreal development kick > open UDK editor (NOT GAME).
<!--[if !supportLists]-->·
<!--[endif]-->Content browser/Welcome > click new
map on welcome screen > select the time of the day you want your scene to be
in (usually early morning/late evening for best view) > close the other
windows.
<!--[if !supportLists]-->·
<!--[endif]-->Right mouse tumble/rotates the camera.
<!--[if !supportLists]-->·
<!--[endif]-->Left and right mouse at the same time
pans the cameras.
<!--[if !supportLists]-->·
<!--[endif]-->Select camera movement speed at the
top of UDK (next to the blue sideways triangle…play button).
<!--[if !supportLists]-->·
<!--[endif]-->All your models are located in content
browser (next to the binocular icon at the top of UDK interface) select it >
go down to the bottom left of the content browser screen and select UDK game
folder > select the content folder > click new (with content highlighted)
> this will create your “package” which will have all your assets etc in it
> name your package > then under name call it whatever your model is
(i.e. museum study/bookcase) > ignore all other settings > click okay
> if the animation window pops up just close it.
<!--[if !supportLists]-->·
<!--[endif]-->Now look under content > packages
> you should see your newly created package > when you select it there won’t
be anything within it yet > double click select your package > find your
FBX file that you created in Maya > click open and then click ok on the
import screen (if it says out of date FBX just click ok and ignore it).
<!--[if !supportLists]-->·
<!--[endif]-->Now you will see your model on the
content browser (with your package selected) > middle mouse click your asset
and drag it into the UDK space.
<!--[if !supportLists]-->·
<!--[endif]-->If your model is tiny select scale
model (next to drop down world button on UDK interface) so you can scale it up.
Putting
Textures into UDK
<!--[if !supportLists]-->·
<!--[endif]-->On content browser right click
(anywhere within the grey area) and select material from factory > in the
“new” pop up menu re name it accordingly > click okay and the Unreal
Material Editor window will pop up > your model and area will just appear
black because there are no textures assigned to your model within UDK yet >
you can temporarily close this menu > if you now look at the content browser
(your package) there should be a new icon labelled “material” > select new
icon > select import on content browser window > go to folder with
textures (specular, diffuse and normal maps) > now select the textures you
want > hit okay to all > now your textures should appear under your
package as new square icons.
<!--[if !supportLists]-->·
<!--[endif]-->Now we want to link all the textures
(diffuse, normal and diffuse) to the model > double click material to bring
up material editor (screen where your model looks black) > we need to add 3
blank texture maps > on the top right corner of the window find
“TextureSample” > middle mouse click drag to the blank window OR hold “T” on
the key board, left mouse click grey area.
<!--[if !supportLists]-->·
<!--[endif]-->Select any one of the black boxes >
then select any one of your textures in the content browser > click small
green arrow at the bottom right of the Unreal material editor > now the
black box should have the map you selected appear on it.
<!--[if !supportLists]-->·
<!--[endif]-->Your model will still appear black on
the Unreal material editor so you need to drag the black small box (next to the
texture box you just assigned in the Unreal material editor) to the correct
map. For example if the first map texture you put in is a diffuse map, then
drag the small black box so that it connects to the word diffuse under the
Unreal texture editor. Repeat the process for each of your textures making sure
they are linked via small black box drag to their correct name. If you are
doing this correctly the ball in the preview will now appear textured and not
black. Make sure you save this now by selecting the green tick at the top left
of the Unreal material editor > do not close it yet > under material in
the bottom of the Unreal material editor screen > select material >
ensure two sided is checked > save again > now you can close this window.
<!--[if !supportLists]-->·
<!--[endif]-->In the content browser double click
your static mesh icon in content browser > this brings up the static mesh
editor window.
<!--[if !supportLists]-->·
<!--[endif]-->Now that your model is open in the
static mesh editor go back to content browser and left click once the square
icon that says “material” > go onto LOD info on the static mesh editor >
drop down the menu until you find “material” > click the small green button
(use selected object) > now you can close this window and view your textures
upon your model in the main UDK interface.
<!--[if !supportLists]-->·
<!--[endif]-->To play and move around your object
press the play button on the main UDK interface (blue triangle button/alt +
F8/Play in Viewport).
At
this stage you should have a package which contains:
Static
mesh
“AnimSet”
Material
Any
texture maps you created (specular, normal and diffuse perhaps).
<!--[if !supportLists]-->·
<!--[endif]-->You should save your package >
right click your package > and select save > your package will now jump
to under the UDK Games folder so you should save it again.
<!--[if !supportLists]-->·
<!--[endif]-->When you re open UDK your model wont
appear because its not within the level, you must save your map, to fix this on
the main UDK interface select save under the file tab at the top of the screen
> save it as “Map Files”. Remember, there is a difference between saving
your level and saving your assets ;)
Adding
Collision Meshes
Under the content
browser/right click mesh and select find in content browser > double click the
square static mesh icon under the content browser (in your package) > this
opens the Unreal static mesh editor > at the top you can easily select the
button that says “collision” > on the drop down menu select auto convex
collision > alter the settings for basic meshes > apply > then select
“ShowCollision” (green button at the top of the static mesh editor). (NOTES BY JESS SMITH) Here are some current screenshots of my model. I have left the check box textures on my shelf and table to show that they have been mapped properly and adjusted accordingly to the above steps I put together explaining how to map them.   After much extensive digging through my files, i came across my file on texturing in Maya. here are my notes for it: 
Screenshot of my first shot at lighting. I created a very dark yellow glow to bring the games mood to life.
Texturing Tutorial
Notes
·
In order to cylindrical map. Edit Mesh >
Create UV’s > cylindrical mapping. Rotate the viewport 90 degrees according
to the shapes position
·
Shaping interface > Hypershader/perspective
> (left side) > materials (bar above mini previews on the right side)
> mental ray > surface shader
·
Select mesh > right click surface shader >
assign material to selection (or edit > assign material to object)
·
MESH UV MUST BE
UNWRAPPED!!!!
·
Mental
ray > textures > mb_amb_occlusion
texture (gives a white texture), put them aside (have surface shader from
before and the mb_amb_occlusion
shade)
·
Linking the textures > middle mouse and drag
the mb_amb_occlusion to the surface
shader > default > double click on mb_amb_occlusion
·
SHADES
CAN BE CHANGED ANYTIME
·
Return to interface > choose render from drop
down (where polygons, animation etc is) > lighting and shading > batch
bake (mental ray), click the box beside it > (to choose objects it can be
either selected or all, first drop down bar on the page) > turn on use bake
set override (can tick original shading network, as a safe guard) > change
colour mode to occlusion (which is the rendered black and white > change the
resolution; if you need to use a 512 texture, change both axis x, y to 1024
> change format but don’t use JPEG >
convert and close (calculates in bottom left) > automatically bakes onto the
wheel.
·
In order to create shadows, using an ambient
occlusion is recommended for everything!
·
Any textures extracted from the web into PS, MUST be the same resolution as your mesh!
·
To get a UV snapshot > UV editor >
polygons > UV snapshot. To save it; select an image size and file format
(doesn’t matter if it’s a JPEG
·
Then in PS you should have the UV lines from texture
editor
·
Shift and drag the UV map onto the occlusion
map, (have two layers; one being the ambient occlusion and the UV’s)
·
A good texture is creating your own base layer!
(name it base) Always have the base layer at the bottom of all layers >
re-colour it to a neutral grey.
·
Like before, drag the textures onto the larger
file with all the layers, and re-name it. Change the ambient occlusion map from
normal mode to multiply mode, increasing the intensity of light and dark. Turn
off the view of the ambient occlusion layer, and it should display the texture
over the UV’s
·
NEVER TOUCH THE UV
LAYER! ITS JUST A GUIDELINE
·
Save the file as a diffuse map (TIFF is fine)
name wheel_diff
·
Back to Maya (still in Hypershader)
·
Blinn (basic surface shader for metal, glass,
wood, marble) > middle click and drag blinn to the mesh and it will change
it immediately
·
In Blinn shader > select texture > file
> Viola!
·
To split textures accordingly to the UV’s
(supposed to) use magic wand. In this case use lasso tool to select round what
you want to change the texture and save it again and repeat the previous
process to alter the single textured mesh. As a shortcut you can simple update
the material on Maya through the editor and select reload. It should reload the
texture to the mesh with the updated save made in PS.
·
Provided that all layers are well managed and
name correctly, you can have as many layers as you want over your UV’s.
·
To control the
textures ‘shine’, adjust the secularity
·
At this stage; group all the layers in PS and call
it ‘diffuse map’. Leave the UV map apart from the textures
·
Create another folder called ‘specular’ >
save the work as a JPEG file > import the file into PS as a new format > image
> black and white > image >adjustments (changes the colour intensity,
if you want)
·
Its saved as a JPEG so you can drag it back onto
the grouped specular file
·
In Maya; change the specular colour >
chequered logo > locate the file saved in PS > open > re-render. As
you render and save images you can see the step by step process to how the
mesh’s texture has changed in shadows, lighting and colour differentiation
More Problems Encountered Through out this project I had planned to create a series of print screen walk throughs describing my progress. However, time became my enemy as deadline closed in. I was having to make so many changes, I have been focussing on getting my model finished and working instead. Instead of print screened walkthroughs I will try to describe the process in words. First initial problem was my rooms were too perfect and needed some form of offset adjustments, so I added a cut off corner , and made it a single faced wall model, with a doorway to act as the starting point for the demo in UDK. When I imported this single wall model into UDK, not all the wall was there so I had to add another wall, by duplicating the previous one, scaling it up and merging it with the other. Once that was done, it worked fine in UDK. Applying the ambient occlusions to my objects was the next stage. I have uploaded a small tutorial above, describing on the process. When I did it myself, Maya 2013 crashed over and over so I had to download the 2012, which worked fine. That cost me a whole evening, but it paid off once it was installed. I then applied the textures on the occlusions in Photoshop to create a dark shaded, black and white textured, which really brought out then dark connotations of the game. With everything occluded and textured I could then start importing the models, textures and occluded maps into UDK to make it all game ready. I have included a walkthrough, written by Jess Smith above talking about exporting files from Maya into UDK and applying the textures. Jack, one of my fellow peers helped me with exporting the objects, as I encountered a mass of problems such as images not importing and missing some important tick boxes to avoid objects missing in the scene. Once all that was in and working I went back to Maya and created some lighting. I was aiming for a faint yellow light to add a sense of colour, still meeting the connotations of the games black and white genre. I added three faint lights at the far end of the room above the wall paper, to mildly illuminate the entire room. I am very happy with the finished result. I had applied some Blinn material textures to my scene, making them way too shiny when adding the lighting, so I had to change them to Lambert instead to avoid the shine. When I applied the changes, they looked a lot better. When I textured the wall and floor, it was all one object, so I had to UV map the floor and the textured wall as one UV. These were the two most important surfaces so I made these the biggest UVs and shrunk the rest. I then applied the textures in Photoshop, resizing them according to the UV's. I then applied the occlusion layer over the textured UV's to gain the show effect, making them look amazing. i was so happy with the finished result when I imported the new textures back into Maya. However! The occluded walls around the wallpaper were WAY too blurry. This was because the UV's were so tiny, therefore effecting the quality of the occlusion. But I only wanted to texture the wallpapered wall and the floor, so I am not too fussed. My finished result ended with all my objects, mapped, textured, with ambient occlusions imported into UDK and ready to render. The lighting in UDK is the last subject I need to tackle. I will ensure that I mentioned all problems I have encountered in my 500 word written evaluation.
Production: BA5 Focus 2 Project Evaluation
For this project I aim to make a living room scene, based
around the previous studio project. It will need to be textured and UV mapped,
ready to export into the game engine, UDK (Unreal Development Kit). I am creating
a small number of assets as well, to go into the scene. I will be writing about
the process I took to build my scene and the problems I encountered.
I started by setting up a scaled grid in Maya and building
the initial room. I wanted to build a set of small rooms connected for the
player to walk through. This became too much of a challenge, and time and skill
was against me. Instead I built one room from a manipulated cube using the
extrude tool. I stuck with a simple rectangular room, and added an offset
corner, to make the room realistic, to a perfectly shaped cuboid. To create a
doorway I extruded a set of subdivided edges from the room model and extracted
it to make it a separate object.
Making the table, shelves and carpet was a simple process.
My aim was to make simple assets, textured and working in UDK. The constructing
process involved extruding and moving selected, subdivided edges. To gain
accuracy to a life like model I ensured I referred to my reference images.
The sofa was a much trickier model because I aimed to have
rounded, soft-modeled cushion. This was a learning process for me. I started by
making a number of subdivisions and manipulating the vertices Individually to
gain some form of pillow like model. This was a time consuming process and
didn’t come out with a finished result I was happy with. Instead I selected a
group of faces and moved them out to create a rounded pillow. The smaller
cushions were done the same way but with more precise manipulation with the
vertices and faces. I constantly checked my UV map. I didn’t want the map to be
too complex for some simple geometry, so any messy UV’s I found I cleaned up on
the model by deleting and replacing them with something simpler.
To create an effective shadow effect I applied an ambient
occlusion to each object, and reapplied the textures to each object with the
occlusion attached. It took me some time to get to grips with editing UV’s and
textures in Photoshop, but it was a breeze when I got the hang of it. To create
a realistic atmosphere I assigned each object material accordingly to make it
shiny (Blinn) or matt (Lambert).
With my model complete in Maya it was time to export it into
UDK, to add collision meshes, re-texture and add lighting. Once this process
was complete I rendered a small video using Fraps to record the UDK default
character walking around my scene.
I found this project a massive learning curve. I encountered
problems at every corner and with help from my fellow peers and lecturer I was
able to over come them and find new, simpler ways to complete my project. If I
was to re make my scene and have more time, I will approach it with a whole new
skillset in modelling, texturing and applying a variety of materials and
occlusions. Making my assets more detailed and make extra rooms to attach to
the model in reference to my team members floor plan.
Its that time again... Deadline, and once again my work encounters problems. All my textures were everywhere and needed reassigning, causing Maya to crash over and over. Once that was sorted, tackling lighting was the next stage, which created more problems. No matter how high I had the light density the render view still showed my model int he dark. As time was against me I put the briefs expectations into consideration and gave up trying to render an in Maya mov file and just focused on UDK instead. More problems again. the computer's in Uni couldn't load my UDK document. The computer would crash every time I tried to open my work, so I couldn't get the essential last minute help I needed from Lothar to add a collision mesh to my rooms walls and adding lighting too. Instead I had to make do with what I had. I was still happy with what I had. All my interior objects had been equipped with a collision mesh making them interactive and they were textured too, meeting the expectations of the brief and my learning agreement. As mentioned in my evaluation if I had more tuition and time I would be happy to continue my room model making it even better.
Revisions and Changes to Design Document
Working alongside 2D artist, Sophie from my
previous project, we set out to design and make a scene set within the world of
our game that we re-invented. I was responsible for creating the initial scene
using 3D software Maya and manipulating asset textures using Photoshop. The one
key problem with our task was time. In this document I will talk about the ups
and downs of our project and changes we had to make to work around the time and
skills we had with the software we were using.
As Sophie was working on the 2D designs for
the room, I was waiting on her to send me the first initial plan to get started
building. After completing a first floor plan model, I was criticized saying it
was too big and had a number of broken features such as hidden faces, misaligned
edges and stray vertices, meaning it wasn’t going to work effectively in a game
engine.
I returned with the feedback and Sophie
worked on a new floor plan for me, and included a layout where the assets would
be positioned. The new plan was to create a single living room scene, full of
some basic, textured assets. The new design was a lot simpler to construct and
took no time at all.
The real problem was making the assets. As
my skills in Maya are lacking I took a number of attempts at making a sofa. I
referred to a number of different images from the Internet, which matched the
connotations of our game design. None of the models I made were quite up to
scratch, so I asked one of my highly skilled 3D peers (Nathan) for help. He
gave me some good advice and walked me through making a better game ready sofa
model.
I also made a small coffee table and a
bookshelf. These assets were much easier to make as they were simple square
based models, made through simple extruding and subdividing.
The UV mapping and texturing went perfectly
according to the game design document and Sophie’s artwork.
The next problem I encountered was the
lighting. We wanted the lighting to create a dark, eerie atmosphere, to set the
scene for the games horror-based genre. The game’s initial visuals are in black
and white, with yellow as the only colour any player will see. Therefore the
lighting was intended to be yellow.
I used a number of different lights in
Maya. The ambient area light was my favorite, and really brought out the
atmosphere I was looking for. However, when examining the model in render view,
the scene was still far too dark. I tried other lighting, but it just made
things worse. Instead we agreed to drop the lighting in Maya all together and
try lighting the scene after I exported the model to UDK.
Time was now really against us to get the
final stage of the model completed in UDK. I managed to get it all exported
with textures and collision meshes, but I couldn’t figure out how to get the
lighting to work. I was unable to find any helpful tutorials so I stuck with
setting the model in a dark, moonlit scene to create an alternative atmosphere
to compensate for the missing lighting.
After all the problems we encountered with
our design, we remain happy with the altered results we finished with. Sophie
had produced a number of game play videos, with artwork involving concept art
and floor plans to support them. I had finished with a living room scene,
containing, textured, interactive assets, but with no lighting. But from my personal perspective, my finished
result still meets the brief. The assets work and they are interactive in UDK.
|